How to add TableRow into Table dynamically with flutter? | Codzify
Article by: Manish Methani
Last Updated: September 9, 2021 at 2:04pm IST
Table of Contents:
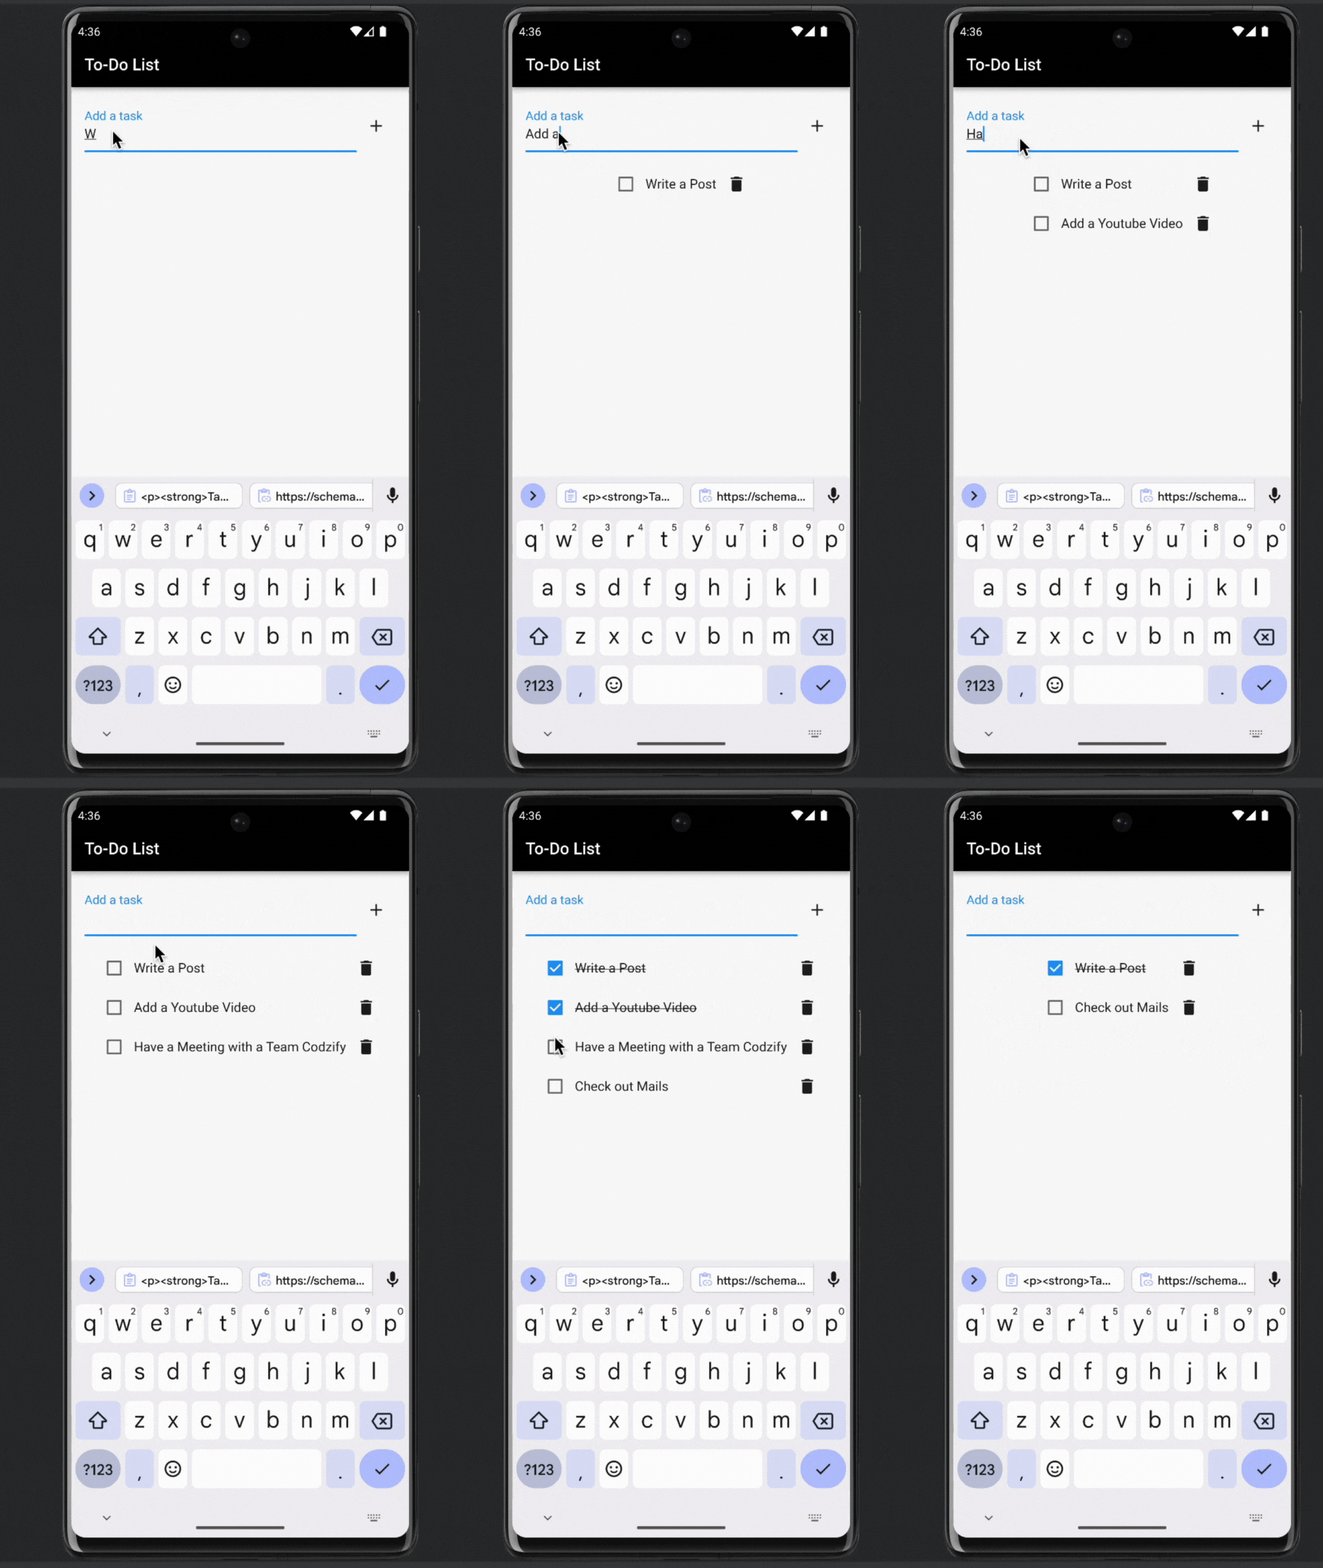
Final Output

Introduction
Flutter, developed by Google, is a popular open-source framework for building natively compiled applications for mobile, web, and desktop from a single codebase. In this article, we'll walk you through the process of building a To-Do List app using Flutter. This app allows you to create, manage, and mark tasks as completed in a stylish and user-friendly interface.
Step1: Setting Up the Environment
Before we dive into creating the To-Do List app, ensure that you have Flutter and Dart installed on your system. You can check your installation by running the following command:
flutter --version
If you don't have Flutter and Dart installed, you can follow the official installation guide on the Flutter website.
Step 2: Create a New Flutter Project
In your terminal or command prompt, create a new Flutter project using the following command:
flutter create todo_list_app
Step 3: Navigate to Your Project Directory
Change your current directory to the newly created project directory:
cd todo_list_app
Step 4: Open Your Project in a Code Editor
Open your project in your preferred code editor. You can use Visual Studio Code, Android Studio, or any other IDE of your choice.
Step 5: Modify the lib/main.dart File
import 'package:flutter/material.dart';

void main() {

  runApp(MyApp());

}

class Task {
  String description;
  bool isCompleted;

  Task(this.description, this.isCompleted);
}

class MyApp extends StatelessWidget {
  @override
  Widget build(BuildContext context) {
    return MaterialApp(
      debugShowCheckedModeBanner: false,
      home: Scaffold(

        appBar: AppBar(

          backgroundColor: Colors.black,
          title: Text('To-Do List'),

        ),
        body: TodoList(),
      ),
    );
  }
}

class TodoList extends StatefulWidget {
  @override
  _TodoListState createState() => _TodoListState();
}

class _TodoListState extends State {
  List tasks = [];
  TextEditingController taskController = TextEditingController();

  void addTask(String description) {
    setState(() {
      tasks.add(Task(description, false));
      taskController.clear();
    });
  }

  void removeTask(int index) {
    setState(() {
      tasks.removeAt(index);
    });
  }

  @override
  Widget build(BuildContext context) {
    return Column(
      children: [
        Padding(
          padding: const EdgeInsets.all(16.0),
          child: Row(
            children: [
              Expanded(
                child: TextField(
                  controller: taskController,
                  decoration: InputDecoration(labelText: 'Add a task', labelStyle: TextStyle(fontSize: 20.0),),

                ),
              ),
              IconButton(

                icon: Icon(Icons.add),
                onPressed: () {
                  if (taskController.text.isNotEmpty) {
                    addTask(taskController.text);
                  }
                },
              ),
            ],
          ),
        ),
        Table(
          defaultColumnWidth: IntrinsicColumnWidth(),
          children: tasks
              .asMap()
              .entries
              .map((taskEntry) {
            final index = taskEntry.key;
            final task = taskEntry.value;
            return TableRow(
              children: [
                TableCell(
                  child: Row(
                    children: [
                      Checkbox(
                        value: task.isCompleted ?? false,
                        onChanged: (bool? value) {
                          if (value != null) {
                            setState(() {
                              task.isCompleted = value;
                            });
                          }
                        },
                      ),

                      Text(
                        task.description,
                        style: TextStyle(
                          fontSize: 16.0,
                          decoration: task.isCompleted
                              ? TextDecoration.lineThrough
                              : TextDecoration.none,
                        ),
                      ),
                    ],
                  ),
                ),
                TableCell(
                  child: IconButton(
                    icon: Icon(Icons.delete),
                    onPressed: () {
                      removeTask(index);
                    },
                  ),
                ),
              ],
            );
          })
              .toList(),
        ),
      ],
    );
  }
}

Step 6: Run the App
In your terminal, execute the following command to run your app on an emulator or connected device:
Step 7: Test the To-Do List App
Once your app is running, open the emulator or your physical device to test the To-Do List app. You can add tasks, mark them as completed, and delete them.
Step 8: Customize and Expand
Feel free to customize the app further and expand its features to meet your requirements. You can modify the UI, add due dates to tasks, implement persistence (storing tasks in a database), and more.
Final Output

Conclusion
In this step-by-step guide, you've successfully built a To-Do List app using Flutter. This app allows you to create, manage, and mark tasks as completed in a user-friendly interface. Flutter provides a powerful platform for developing cross-platform apps with a stylish and responsive design. You can continue to enhance and tailor this app to your specific needs or explore more advanced Flutter capabilities for your future projects.
FAQ
1. How can I dynamically add rows to a table in Flutter?
To dynamically add rows to a table in Flutter, you can follow these steps:
- Create a list or data structure to hold the table rows data.
- Use a stateful widget to manage the tables state.
- In the widgets build method, create a table and use a `ListView.builder` to populate the rows from the data source.
- To add a new row dynamically, update the data source and call `setState` to trigger a rebuild of the widget.
2. How can I remove rows from a table in Flutter?
To remove rows from a table in Flutter, you can follow these steps:
- Identify the row you want to remove and update the data source by excluding that specific row.
- Call `setState` to trigger a rebuild of the widget, reflecting the changes in the tables data source.
3. How can I customize the appearance of a dynamic table in Flutter?
You can customize the appearance of a dynamic table in Flutter by adjusting various properties and styles:
- Use the `Table` and `TableRow` widgets to structure your table.
- Modify the `TextStyle` of the text within the table cells to change the font size, color, or decoration.
- Apply padding and alignment properties to control the spacing and alignment of table cells.
- Add color or background decoration to the table cells to achieve the desired look.

