How to create Self-Sizing Table View Cells programmatically in Swift iOS - Codzify.com Tutorials
Article by: Manish Methani
Last Updated: September 25, 2021 at 8:04am IST
Custom cells are used to create the customised cells in the way we want to display to make our user interface more convenient. In our previous tutorial, we studied about how to create default UITableView cells and now the purpose of this tutorial is mainly focused on how to self-size or resize UITableView cells using Autolayout.
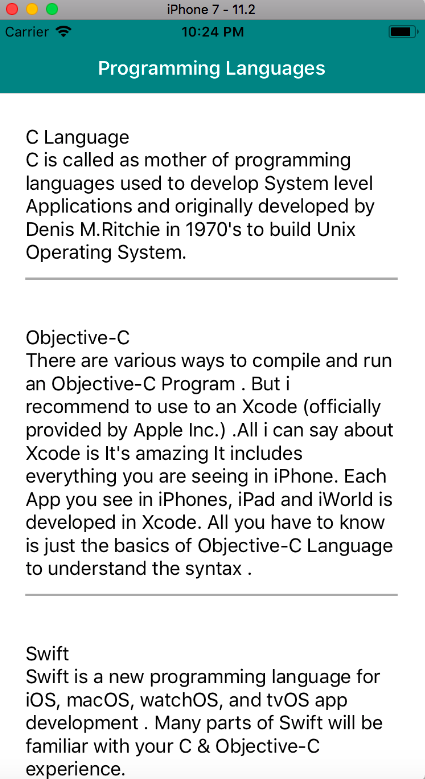
Final Output
We will create a programming app which basically displays the programming languages and the specific description related to it. So the basic challenge in this app is we have to resize the cells based on the length of its short description.
Get Started by creating an UITableView
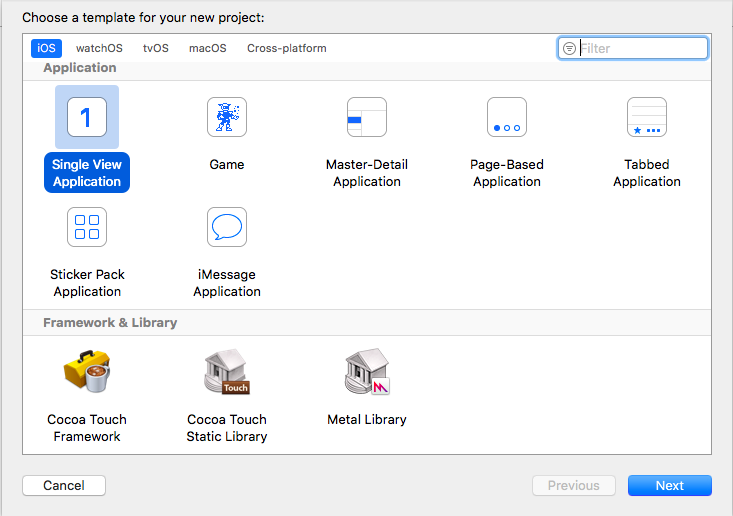
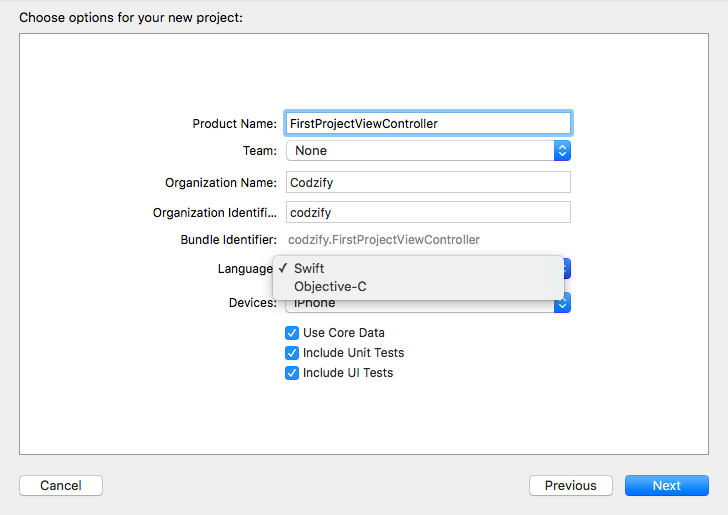
Open Xcode Goto File > New >Project >Single View Application > Enter Project Name (eg :- FirstProjectViewController) and Select Language as Swift> Done.
Now you can see a file on left navigation Menu of Xcode named, ViewController.swift
We firstly begins with AppDelegate.swift file. Copy and paste this code in didFinishLaunchingWithOptions method (the very first method you can see in Appdelegate.swift).
import UIKit

@UIApplicationMain
class AppDelegate: UIResponder, UIApplicationDelegate {

    var window: UIWindow?


    func application(_ application: UIApplication, didFinishLaunchingWithOptions launchOptions: [UIApplicationLaunchOptionsKey: Any]?) -> Bool {
        // Override point for customization after application launch.

        window = UIWindow(frame: UIScreen.main.bounds)
        let mainController = ViewController() as UIViewController
        let navigationController = UINavigationController(rootViewController: mainController)
        navigationController.navigationBar.isTranslucent = false
        self.window?.rootViewController = navigationController
        self.window?.makeKeyAndVisible()

        return true
    }
AppDelegate is the file which will be called at first on initial startup of our app. We used to create many ViewControllers in our project so in didFinishLaunchingApplications we write the name of specific ViewController to begin with. This is the initial entry point for our app. In this example, we begin with ViewController.swift file.
UINavigationController is the header with teal color as you can see in the image of Final Output. UINavigationController word itself tells its meaning which is "It Controls all the navigation of app"
self.window?.rootViewController = navigationController
In this way you can set your root ViewController. In our case we want ViewController.swift file to be the first one to start.
ViewController.swift file looks like this,
//  ViewController.swift
//  Created by Manish Methani.
//  Copyright � 2018 Codzify. All rights reserved.
//

import UIKit

private let myArray: NSMutableArray = ["C Language
C is called as mother of programming languages used to develop System level Applications and originally developed by Denis M.Ritchie in 1970's to build Unix Operating System.",

"Objective-C
There are various ways to compile and run an Objective-C Program. But I recommend using to an Xcode (officially provided by Apple Inc.).All I can say about Xcode is It's amazing It includes everything you are seeing in iPhone. Each App you see in iPhones, iPad, and iWorld is developed in Xcode. All you have to know is just the basics of Objective-C Language to understand the syntax .",

"Swift
Swift is a new programming language for iOS, macOS, watchOS, and tvOS app development. Many parts of Swift will be familiar with your C & Objective-C experience."]

var myTableView = UITableView()
class ViewController: UIViewController,UITableViewDataSource,UITableViewDelegate {
    override func viewDidLoad()
    {
        super.viewDidLoad()

        self.view.backgroundColor = UIColor.white
        self.navigationItem.title = "Programming Languages"

        self.navigationController?.navigationBar.barTintColor = UIColor.init(red: 0/255.0, green: 128/255.0, blue: 128/255.0, alpha: 1.0)
        self.navigationController?.navigationBar.titleTextAttributes = [NSAttributedStringKey.foregroundColor: UIColor.white]
        self.navigationController?.navigationBar.tintColor = UIColor.white


        myTableView = UITableView()
        myTableView.register(CustomTableViewCell.self, forCellReuseIdentifier: "cell")
        myTableView.dataSource = self
        myTableView.delegate = self
        self.view.addSubview(myTableView)
        myTableView.backgroundColor = UIColor.init(red: 245, green: 245, blue: 245, alpha: 1)
        //Two Golden lines for resizing the table view cells
        myTableView.estimatedRowHeight = 100;
        myTableView.rowHeight = UITableViewAutomaticDimension;
        myTableView.separatorStyle = UITableViewCellSeparatorStyle.none;

       // Table View AutoLayout constraints
        myTableView.translatesAutoresizingMaskIntoConstraints = false

        let topConstraint = NSLayoutConstraint(item: myTableView, attribute: .top, relatedBy: .equal, toItem: self.view, attribute: .top, multiplier: 1, constant: 12)
        self.view.addConstraint(topConstraint)

        let leftConstraint = NSLayoutConstraint(item: myTableView, attribute: .left, relatedBy: .equal, toItem: self.view, attribute: .left, multiplier: 1, constant: 0)
        self.view.addConstraint(leftConstraint)

        let rightConstraint = NSLayoutConstraint(item: myTableView, attribute: .right, relatedBy: .equal, toItem: self.view, attribute: .right, multiplier: 1, constant: 0)
        self.view.addConstraint(rightConstraint)

        let bottoConstraint = NSLayoutConstraint(item: myTableView, attribute: .bottom, relatedBy: .equal, toItem: self.view, attribute: .bottom, multiplier: 1, constant: 0)
        self.view.addConstraint(bottoConstraint)

    }

 // Table View Delegates
    func numberOfSectionsInTableView(tableView: UITableView) -> Int {
        return 0 // you should probably return 1
    }

    func tableView(_ tableView: UITableView, numberOfRowsInSection section: Int) -> Int {
        return myArray.count
    }


    func tableView(_ tableView: UITableView, didSelectRowAt indexPath: IndexPath) {
        print("Num: (indexPath.row)")
        print("Value: (myArray[indexPath.row])")
    }


    func tableView(_ tableView: UITableView, cellForRowAt indexPath: IndexPath) -> UITableViewCell {

        let cell = tableView.dequeueReusableCell(withIdentifier: "cell", for: indexPath) as! CustomTableViewCell

        cell.backgroundColor = UIColor.clear
        cell.nameLabel.text  =  "(myArray [indexPath.row])"

        return cell
    }
}
A short description of example:
We had given a backgroundColor to NavigationBar, Added a Programming Languages title and given it with the white text color.
Here, viewDidLoad() method is called first. In this method, we initialized a UITableView like this,
myTableView = UITableView()
Then, we registered the Datasource and Delegate methods of UITableView. We have to register these methods to implement its delegate & datasource methods.
 myTableView.dataSource = self
myTableView.delegate = self
Then you have to register the forCellReuseIdentifier and give it same name which you can use in cellForRowAtIndexPath method of UITableView.
myTableView.register(CustomTableViewCell.self, forCellReuseIdentifier: "cell")
Last line adds myTableView as a subView inside view.
self.view.addSubview(myTableView)
Following lines help in resizing the cells automatically. You do not have to give specific height to any cell, we will use UITableViewAutomaticDimension
myTableView.estimatedRowHeight = 100;
myTableView.rowHeight = UITableViewAutomaticDimension;
In numberOfRowsInSection we are going to use the count of elements in our NSMutableArray to tell the tableView how many rows to create:
 func tableView(_ tableView: UITableView, numberOfRowsInSection section: Int) -> Int {
        return myArray.count
  }
 func tableView(_ tableView: UITableView, cellForRowAt indexPath: IndexPath) -> UITableViewCell {
        let cell = tableView.dequeueReusableCell(withIdentifier: "cell", for: indexPath) as! CustomTableViewCell

        cell.backgroundColor = UIColor.clear
        cell.nameLabel.text  =  "(myArray [indexPath.row])"

        return cell
    }
CustomTableViewCell.swift File
We use Autolayout to create custom UITableView cell. If you missed the concepts of Autolayout you can refer it here.
import UIKit

class CustomTableViewCell: UITableViewCell {

    var nameLabel = UILabel()

    override init(style: UITableViewCellStyle, reuseIdentifier: String?) {
        super.init(style: style, reuseIdentifier: reuseIdentifier)

        self.selectionStyle = UITableViewCellSelectionStyle.none


        let boxView = UIView()
        self.contentView.backgroundColor = UIColor.clear
        boxView.backgroundColor = UIColor.white
        self.contentView.addSubview(boxView)
        boxView.layer.cornerRadius = 2.0;
        boxView.backgroundColor = UIColor.white;

        // BoxView created using autolayout constraints.
        boxView.translatesAutoresizingMaskIntoConstraints = false

        let topConstraint = NSLayoutConstraint(item: boxView, attribute: .top, relatedBy: .equal, toItem: self.contentView, attribute: .top, multiplier: 1, constant: 12)
        self.contentView.addConstraint(topConstraint)

        let leftConstraint = NSLayoutConstraint(item: boxView, attribute: .left, relatedBy: .equal, toItem: self.contentView, attribute: .left, multiplier: 1, constant: 12)
        self.contentView.addConstraint(leftConstraint)


        let rightConstraint = NSLayoutConstraint(item: boxView, attribute: .right, relatedBy: .equal, toItem: self.contentView, attribute: .right, multiplier: 1, constant: -12)
        self.contentView.addConstraint(rightConstraint)

        let bottoConstraint = NSLayoutConstraint(item: boxView, attribute: .bottom, relatedBy: .equal, toItem: self.contentView, attribute: .bottom, multiplier: 1, constant: -12)
        self.contentView.addConstraint(bottoConstraint)


        //Here label added to boxView
        nameLabel = UILabel()
        boxView.addSubview(nameLabel)
        nameLabel.textColor = UIColor.black
        nameLabel.numberOfLines = 0;
        nameLabel.lineBreakMode = NSLineBreakMode.byWordWrapping;

        // namelabel constraints
        nameLabel.translatesAutoresizingMaskIntoConstraints = false

        let topLabelConstraint = NSLayoutConstraint(item: nameLabel, attribute: .top, relatedBy: .equal, toItem: boxView, attribute: .top, multiplier: 1, constant: 4)
        boxView.addConstraint(topLabelConstraint)

        let leftLabelConstraint = NSLayoutConstraint(item: nameLabel, attribute: .left, relatedBy: .equal, toItem: boxView, attribute: .left, multiplier: 1, constant: 12)
        boxView.addConstraint(leftLabelConstraint)


        let rightLabelConstraint = NSLayoutConstraint(item: nameLabel, attribute: .right, relatedBy: .equal, toItem: boxView, attribute: .right, multiplier: 1, constant: -12)
        boxView.addConstraint(rightLabelConstraint)


        //Separator line added to View
        let separatorView = UIView()
        boxView.addSubview(separatorView)
        separatorView.backgroundColor = UIColor.lightGray

        // Separator line constraints
        separatorView.translatesAutoresizingMaskIntoConstraints = false

        let heightSeparatorConstraint = NSLayoutConstraint(item: separatorView, attribute: .height, relatedBy: .equal, toItem: nil, attribute: .notAnAttribute, multiplier: 1, constant: 2.0)
        boxView.addConstraint(heightSeparatorConstraint);

        let topSeparatorConstraint = NSLayoutConstraint(item: separatorView, attribute: .top, relatedBy: .equal, toItem: nameLabel, attribute: .bottom, multiplier: 1, constant: 12)
        boxView.addConstraint(topSeparatorConstraint)

        let leftSeparatorConstraint = NSLayoutConstraint(item: separatorView, attribute: .left, relatedBy: .equal, toItem: boxView, attribute: .left, multiplier: 1, constant: 12)
        boxView.addConstraint(leftSeparatorConstraint)


        let rightSeparatorConstraint = NSLayoutConstraint(item: separatorView, attribute: .right, relatedBy: .equal, toItem: boxView, attribute: .right, multiplier: 1, constant: -12)
        boxView.addConstraint(rightSeparatorConstraint)


        // Golden line which do all the resizing of cell stuff
        let bottomSeparatorCosntraint = NSLayoutConstraint(item: separatorView, attribute: .bottom, relatedBy: .equal, toItem: boxView, attribute: .bottom, multiplier: 1, constant: -12)
        boxView.addConstraint(bottomSeparatorCosntraint)


    }

    required init?(coder aDecoder: NSCoder) {
        fatalError("init(coder:) has not been implemented")
    }


    override func awakeFromNib() {
        super.awakeFromNib()
        // Initialization code
    }

    override func setSelected(_ selected: Bool, animated: Bool) {
        super.setSelected(selected, animated: animated)

        // Configure the view for the selected state
    }

}
In this cell, we created one boxView which is subview of self.contentView Then we added the nameLabel which is subview of boxView. Now, we know that Size of nameLabel changes as per length of description of programming languages. So we need to resize the boxView accordingly.
// Golden line which will do all the resizing of cell stuff
        let bottomSeparatorCosntraint = NSLayoutConstraint(item: separatorView, attribute: .bottom, relatedBy: .equal, toItem: boxView, attribute: .bottom, multiplier: 1, constant: -12)
        boxView.addConstraint(bottomSeparatorCosntraint)
We added bottom of separatorView as bottom of boxView. top of separatorView will be bottom of nameLabel. top of nameLabel will be boxView relative and top of boxView will be top of self.contentView. Got it?
This is how we can create self-sizing Table View cells programmatically in Swift iOS.